为文章添加系列模块
感谢 blowfish 提供灵感。用 shortcode 灵活插入文章任意位置,自动标注当前文章位置,非常适合主题文章整理使用。
首先是 front matter 的设置,在需要纳入合集的文章中添加:
series = ["建站"]
series_order = 1
然后在想插入系列目录的位置,加上 shortcode:
{{< seriesbox >}}
新建文件:
layouts/shortcodes/seriesbox.html
{{ $series := index .Page.Params.series 0 }}
{{ if $series }}
  {{ $pages := where site.RegularPages "Params.series" "intersect" (slice $series) }}
  {{ $pages = where $pages ".Params.series_order" "!=" nil }}
  {{ $pages = sort $pages "Params.series_order" }}
  {{ if gt (len $pages) 1 }}
    <details class="series-box" open>
      <summary class="series-title">
        本文属于 <strong>{{ $series }}</strong> 系列
      </summary>
      <ol class="series-list">
        {{ range $pages }}
          <li>
            <a href="{{ .RelPermalink }}" class="{{ if eq $.Page.Permalink .Permalink }}active{{ end }}">
              {{ printf "§ %d: %s" .Params.series_order .Title }}
            </a>
          </li>
        {{ end }}
      </ol>
    </details>
  {{ end }}
{{ end }}
然后在 /assets/scss/custom.scss 中添加样式:
// series
.series-box {
  background: var(--card-background);
  border-radius: 0.5rem;
  padding: 1rem;
  margin: 2rem 0;
  box-shadow: var(--shadow-l1);
  color: var(--card-text-color-main);
}

.series-box summary,
.series-box .series-title {
  color: var(--body-text-color);
  font-weight: 600;
  margin-bottom: 0.75rem;
  cursor: pointer;
}

.series-box ol.series-list {
  padding-left: 1.25rem;
  margin: 0.5rem 0 0 0;
}

.series-box li {
  margin: 0.25rem 0;
  list-style: none;
}

.series-box a {
  color: var(--card-text-color-main);
  text-decoration: none;
}

.series-box a.active {
  font-weight: bold;
  color: var(--accent-color);
}
全站背景图
感谢gpt-4o的帮助
一开始,我用 body::before 和 body::after 分别添加背景图与遮罩,实现深浅模式切换不同的背景图。
电脑上看起来不错,我美滋滋打开手机,发现效果十分鬼畜。我震惊极了,掏出安卓手机,正常,掏出iPad,正常,打开chrome选苹果设备,还是正常。于是询问gpt。
这正是 background-attachment: fixed 在 iOS 上的经典 bug 症状:
❌ 滚动卡顿、不平滑、页面切换缩放异常,甚至页面跳动
✅ Chrome 模拟器不出现,但 iPhone 真机 Safari / Chrome 都有问题(因为都用 WebKit)
- iPhone 上页面滚动卡顿,切换页面时出现缩放跳动
background-attachment: fixed在 iOS 上无效- 遮罩与背景图共用一个层容易产生兼容性问题
解决方案:使用真实 DOM 元素代替伪元素
将背景图和遮罩分为 .bg-layer 与 .bg-mask 两个固定层,结构更稳定。
layouts/_default/baseof.html(插入至 <body> 内部顶部):
<div class="bg-layer"></div>
<div class="bg-mask"></div>
custom.scss:
.bg-layer {
  position: fixed;
  top: 0; left: 0; right: 0; bottom: 0;
  z-index: -3;
  background-image: url('/dark.jpg');
  background-size: cover;
  background-position: center;
  background-repeat: no-repeat;
  pointer-events: none;
  transition: background-image 0.3s ease;
}

.bg-mask {
  position: fixed;
  top: 0; left: 0; right: 0; bottom: 0;
  z-index: -2;
  background-color: rgba(34, 45, 41, 0.4); // 遮罩
  transition: background-color 0.3s ease;
  pointer-events: none;
}

// 如果深浅模式都用一张图,可以去掉这三行
[data-scheme="light"] .bg-layer {
  background-image: url('/light.jpg');
}

[data-scheme="light"] .bg-mask {
  background-color: rgba(218, 255, 251, 0.8);
}
页尾添加分享链接
感谢gpt-4o和gemini老师的帮助
UI方面,我从tabler.io下载的,并inline到我的html里,喜欢其他icon请自行替换
首先是逻辑,新建layouts/partials/article/components/share-buttons.html
<!-- Share Card -->
<div class="share-card">
  <div class="share-card-text">
    <span>分享这篇文章<br>微信推荐直接使用浏览器的分享功能</span>
  </div>

  <!-- Left: Share buttons -->
  <div class="share-card-buttons">
    <!-- Twitter -->
    <a href="https://twitter.com/intent/tweet?url={{ .Permalink }}&text={{ .Title }}" target="_blank" title="Share on X">
      <svg xmlns="http://www.w3.org/2000/svg" width="24" height="24" viewBox="0 0 24 24"
           fill="none" stroke="currentColor" stroke-width="1" stroke-linecap="round" stroke-linejoin="round"
           class="icon">
        <path stroke="none" d="M0 0h24v24H0z" fill="none"/>
        <path d="M4 4l11.733 16h4.267l-11.733 -16z" />
        <path d="M4 20l6.768 -6.768m2.46 -2.46l6.772 -6.772" />
      </svg>
    </a>

    <!-- Copy Link -->
    <a href="#" onclick="copyToClipboard('{{ .Permalink }}'); return false;" title="Copy Link">
      <svg xmlns="http://www.w3.org/2000/svg" width="24" height="24" viewBox="0 0 24 24"
           fill="none" stroke="currentColor" stroke-width="1" stroke-linecap="round" stroke-linejoin="round"
           class="icon">
        <path stroke="none" d="M0 0h24v24H0z"/>
        <path d="M10 14a3.5 3.5 0 0 0 5 0l4 -4a3.5 3.5 0 0 0 -5 -5l-.5 .5" />
        <path d="M14 10a3.5 3.5 0 0 0 -5 0l-4 4a3.5 3.5 0 0 0 5 5l.5 -.5" />
      </svg>
    </a>
  </div>

  <!-- Right: WeChat -->
  <div class="share-card-qr">
    <svg xmlns="http://www.w3.org/2000/svg" width="24" height="24" viewBox="0 0 24 24"
         fill="none" stroke="currentColor" stroke-width="1" stroke-linecap="round" stroke-linejoin="round"
         class="icon wechat-icon">
      <path stroke="none" d="M0 0h24v24H0z" fill="none"/>
      <path d="M16.5 10c3.038 0 5.5 2.015 5.5 4.5c0 1.397 -.778 2.645 -2 3.47l0 2.03l-1.964 -1.178a6.649 6.649 0 0 1 -1.536 .178c-3.038 0 -5.5 -2.015 -5.5 -4.5s2.462 -4.5 5.5 -4.5z" />
      <path d="M11.197 15.698c-.69 .196 -1.43 .302 -2.197 .302a8.008 8.008 0 0 1 -2.612 -.432l-2.388 1.432v-2.801c-1.237 -1.082 -2 -2.564 -2 -4.199c0 -3.314 3.134 -6 7 -6c3.782 0 6.863 2.57 7 5.785l0 .233" />
      <path d="M10 8h.01" />
      <path d="M7 8h.01" />
      <path d="M15 14h.01" />
      <path d="M18 14h.01" />
    </svg>

    <img id="wechat-qr-img" alt="WeChat QR Code" />
  </div>
</div>

<!-- Script -->
<script src="https://cdn.jsdelivr.net/npm/qrcode/build/qrcode.min.js"></script>
<script>
  function showWeChatQRCode(url) {
    const img = document.getElementById('wechat-qr-img');
    QRCode.toDataURL(url, function (err, result) {
      if (!err) img.src = result;
    });
  }

  function copyToClipboard(text) {
    navigator.clipboard.writeText(text).then(() => alert('Link copied to clipboard!'));
  }

  window.addEventListener('DOMContentLoaded', () => {
    showWeChatQRCode('{{ .Permalink }}');
  });
</script>
然后是/assets/scss/custom.scss
// share
.share-card {
  background: var(--card-background);
  color: var(--card-text-color-main);
  border-radius: var(--card-border-radius);
  padding: var(--card-padding);
  margin-top: var(--section-separation);
  box-shadow: var(--shadow-l1);

  display: flex;
  justify-content: space-between;
  align-items: center;
  gap: 16px;
}

.share-card-text {
  font-size: 1.5rem;
  font-weight: 500;
  color: var(--card-text-color-secondary);
  margin-right: auto;
}

.share-card-buttons a {
  margin-right: 12px;
  display: inline-flex;
  align-items: center;
}

.share-card svg.icon {
  width: 30px;
  height: 30px;
  transition: color 0.3s ease;
}

.share-card-qr {
  display: flex;
  align-items: center;
  gap: 10px;
}

.share-card-qr .wechat-icon {
  color: var(--card-text-color-main);
  stroke: currentColor;
}

.share-card-qr #wechat-qr-img {
  width: 80px;
  height: 80px;
  border-radius: 6px;
}
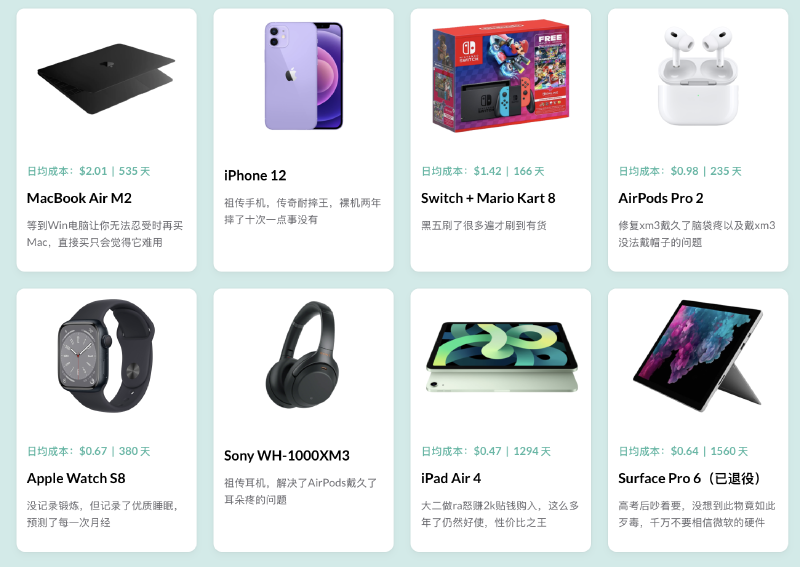
好物页面
创建/layouts/page/goods.html, /layouts/partials/goods-card.html, /data/goods.json
添加回到顶部
首先准备一个图标,放在assets/icons/backTop.svg。我准备的叫arrow-up-dashed,可以直接复制如下代码也可以去下载别的stack主题图标
<svg xmlns="http://www.w3.org/2000/svg"
     width="100%" height="100%"
     viewBox="0 0 24 24"
     fill="none"
     stroke="currentColor"
     stroke-width="2"
     stroke-linecap="round"
     stroke-linejoin="round">
  <path stroke="none" d="M0 0h24v24H0z" fill="none"/>
  <path d="M12 5v6m0 3v1.5m0 3v.5" />
  <path d="M18 11l-6 -6" />
  <path d="M6 11l6 -6" />
</svg>
在layouts/partials/footer/custom.html中,添加
<!--返回顶部 CSS -->
<style>
  #back-to-top {
    display: flex;
    align-items: center;
    justify-content: center;
    padding: 0; /* ensure no internal spacing */
    position: fixed;
    bottom: 15px;
    right: 15px;
    width: 50px;
    height: 50px;
    border-radius: 50%;
    background-color: var(--body-background);
    box-shadow: var(--shadow-l2);
    cursor: pointer;
    transition: transform 0.3s ease, background-color 0.3s ease;
  }

  #back-to-top svg {
    width: 70%;
    height: 70%;
    display: block;
    margin-top: 7px; /*折腾半天无法居中 代码比较丑陋*/
    margin-left: 7px;
    fill: var(--accent-color);
  }

  #back-to-top:hover svg {
    fill: var(--accent-color-darker);
  }


  @media screen and (max-width: 768px) {
    #back-to-top {
      width: 50px;
      height: 50px;
      background-size: 70%;
    }
  }


  @media screen and (min-width: 1024px) {
    #back-to-top {
      bottom: 10px;
      right: 20px;
    }
  }

  @media screen and (min-width: 1280px) {
    #back-to-top {
      bottom: 15px;
      right: 25px;
    }
  }

  @media screen and (min-width: 1536px) {
    #back-to-top {
      bottom: 15px;
      right: 25px;
    }
  }
</style>
在layouts/partials/footer/components/script.html添加
<!-- Add back to top button -->
 <script>
     function backToTop() {
       document.documentElement.scrollIntoView({
         behavior: 'smooth',
       })
     }

     window.onload = function () {
       let scrollTop =
         this.document.documentElement.scrollTop || this.document.body.scrollTop
       let totopBtn = this.document.getElementById('back-to-top')
       if (scrollTop > 0) {
         totopBtn.style.display = 'inline'
       } else {
         totopBtn.style.display = 'none'
       }
     }

     window.onscroll = function () {
       let scrollTop =
         this.document.documentElement.scrollTop || this.document.body.scrollTop
       let totopBtn = this.document.getElementById('back-to-top')
       if (scrollTop < 200) {
         totopBtn.style.display = 'none'
       } else {
         totopBtn.style.display = 'inline'
         totopBtn.addEventListener('click', backToTop, false)
       }
     }
   </script>
归档页面双栏
在 /assets/scss/custom.scss 中加入以下代码
// 归档页面两栏
@media (min-width: 1024px) {
  .article-list--compact {
    display: grid;
    grid-template-columns: 1fr 1fr;
    background: none;
    box-shadow: none;
    gap: 1rem;

    article {
      background: var(--card-background);
      border: none;
      box-shadow: var(--shadow-l2);
      margin-bottom: 8px;
      border-radius: 16px;
    }
  }
}
页边距
在custom.scss添加:
.container {
    margin-left: auto;
    margin-right: auto;

    &.extended {
        /* range: 768-1024 */
        @include respond(md) {
            max-width: 1024px;
            --left-sidebar-max-width: 25%;
            --right-sidebar-max-width: 30%;
        }

        /* range: 1024-1280 */
        @include respond(lg) {
            max-width: 1280px;
            --left-sidebar-max-width: 25%;
            --right-sidebar-max-width: 22%;
        }
    }

    &.compact {
        @include respond(md) {
            --left-sidebar-max-width: 25%;
            max-width: 768px;
        }

        @include respond(lg) {
            max-width: 1024px;
            --left-sidebar-max-width: 20%;
        }

        @include respond(xl) {
            max-width: 1280px;
        }
    }
}